If you spend hours at a desk, scrolling on your phone, or driving, your head has likely crept forward without you noticing.
This subtle shift, called forward head posture, strains your neck, triggers headaches, and can even affect your breathing.
The good news? A simple, evidence-based movement called the chin tuck exercise can help reverse the damage. No equipment needed.
No gym required. Just a few mindful minutes each day. Let me walk you through exactly how to do chin tucks with perfect form, avoid common mistakes, and build lasting posture habits that feel natural, not forced.
Why the Chin Tuck Exercise Matters for Modern Life
We live in a world designed to pull our heads forward. Laptops sit too low. Phones demand a downward gaze. Car seats encourage slouching.
Over time, this habit weakens the deep muscles that hold your head in alignment while tightening others, creating imbalance and pain.
The chin tuck exercise directly counters this pattern. It retrains your neck to find neutral alignment, reducing strain and building postural resilience. Think of it as a reset button for your head and spine.
Chin Tuck Exercise Benefits: More Than Just Posture

This small movement delivers outsized rewards when performed consistently.
Relieving Neck Pain and Tension Headaches
Forward head posture increases load on cervical joints and muscles.
Research shows that for every inch the head shifts forward, the effective weight on the neck increases by approximately 10 pounds. Chin tucks restore alignment, easing this burden and reducing pain triggers.
Correcting Forward Head Posture
Cervical retraction, the clinical term for chin tucking, strengthens the deep cervical flexors, the small muscles responsible for stabilizing your head.
Over time, this builds postural endurance, helping you maintain better alignment without constant conscious effort.
Supporting Jaw Health and Breathing
Poor neck alignment can contribute to jaw tension and shallow breathing. By bringing the head back over the spine, chin tucks create space for the airway and reduce strain on the temporomandibular joint (TMJ).
Many people notice easier breathing and less jaw clenching after consistent practice.
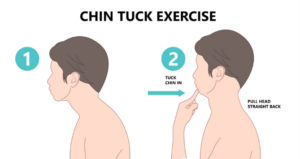
How to Do a Chin Tuck: Perfect Form Step by Step
Proper technique is everything. Doing chin tucks incorrectly can strain your neck or reinforce poor patterns. Follow these cues for safe, effective practice.
Basic Seated Chin Tuck for Beginners
- Sit tall in a chair with feet flat, shoulders relaxed, and eyes looking forward.
- Gently glide your head straight back, as if making a “double chin.” Keep your gaze level, do not look down or tilt your head.
- Hold the tucked position for 3 to 5 seconds, breathing normally.
- Slowly return to neutral. Repeat 8 to 10 times.
Supine Chin Tuck for Better Alignment Awareness
Lying down removes gravity’s influence, making it easier to feel the correct movement.
- Lie on your back with knees bent and feet flat.
- Gently press the back of your head into the surface while tucking your chin slightly.
- You should feel a gentle engagement at the base of your skull, not strain in your throat.
- Hold for 3 to 5 seconds, then release. Repeat 8 to 10 times.
Standing Chin Tuck for Real-World Application
Practice chin tucks while standing to integrate the movement into daily life.
- Stand with your back against a wall, heels 2 to 3 inches away.
- Gently tuck your chin while keeping the back of your head in light contact with the wall.
- Hold for 3 to 5 seconds, then release. Repeat 8 to 10 times.
- Move slowly and with control, no jerking or forcing
- Keep your jaw relaxed, do not clench your teeth
- Breathe naturally throughout the movement
- Stop if you feel sharp pain, dizziness, or numbness
- Use a mirror initially to check that your head moves straight back, not down
Common Mistakes and How to Fix Them
Even simple exercises can go wrong. Avoid these frequent errors to maximize benefit and prevent strain.
| Mistake | Why It Happens | Quick Fix |
|---|---|---|
| Tilting head down instead of gliding back | Confusing chin tuck with chin-to-chest stretch | Keep eyes level, imagine sliding head on a shelf |
| Over-tucking or forcing the movement | Trying to achieve a perfect position too quickly | Use gentle effort, small controlled motions are more effective |
| Holding breath during the exercise | Focusing too hard on form and forgetting to breathe | Count breaths aloud, inhale neutral, exhale tuck |
| Feeling strain in the front of the neck | Using superficial neck muscles instead of deep stabilizers | Reduce range of motion, focus on gentle engagement at the skull base |
Chin Tuck Variations to Build Strength and Control
Once you master the basic chin tuck, these progressions add challenge and functional carryover.
- Chin Tuck with Resistance: Place two fingers lightly on your chin and gently press forward while resisting with your neck muscles. Hold 3 seconds, release. Builds strength without compromising form.
- Chin Tuck with Shoulder Blade Squeeze: Combine cervical retraction with gentle scapular retraction. This integrates neck and upper back alignment for full-posture benefits.
- Dynamic Chin Tucks: Perform slow, controlled tucks while turning your head slightly side to side. Improves coordination and real-world mobility.
- Chin Tuck Holds: Increase hold time to 10 seconds to build postural endurance. Start with 3 to 5 reps and gradually increase.
Always prioritize quality over quantity. Five perfect repetitions are more valuable than twenty sloppy ones.
How Often and When to Practice Chin Tucks
Consistency beats intensity for postural exercises. Aim for:
- 2 to 3 sessions per day
- 8 to 10 repetitions per session
- 3 to 5 second holds for each repetition
Best times to practice:
- First thing in the morning to set alignment for the day
- After prolonged sitting or screen time
- Before bed to release accumulated tension
You can do chin tucks anywhere: at your desk, in the car at a stoplight, or while waiting in line. The key is mindful repetition, not marathon sessions.
Supporting Your Progress: Ergonomics and Daily Habits
Chin tucks work best when paired with supportive daily habits. Small adjustments amplify your results.
- Raise your monitor so the top third is at eye level to reduce forward head strain
- Hold your phone at chest height instead of looking down for extended periods
- Take a 30-second posture break every hour: sit tall, roll shoulders back, and do 3 chin tucks
- Use a supportive pillow that keeps your neck neutral while sleeping
- Stay hydrated, well-hydrated discs support better spinal alignment
Remember: exercises correct muscle patterns, but your environment shapes your posture all day. Align your space to support your efforts.
When to Consult a Physical Therapist
Chin tucks are safe for most people, but professional guidance is wise if you experience:
- Sharp or shooting neck pain during the exercise
- Numbness, tingling, or weakness radiating into arms or hands
- Dizziness, blurred vision, or headaches that worsen with movement
- A history of neck injury, surgery, or diagnosed cervical conditions
A physical therapist can assess your specific posture, tailor chin tuck progressions, and integrate complementary exercises for comprehensive care.
Frequently Asked Questions
▸
What does the chin tuck exercise fix?
The chin tuck exercise primarily addresses forward head posture by strengthening the deep cervical flexors and promoting neutral spinal alignment. This can reduce neck pain, tension headaches, and jaw strain while improving breathing mechanics and postural awareness.
▸
How many chin tucks should I do per day?
Start with 2 to 3 sessions daily, performing 8 to 10 gentle repetitions per session with 3 to 5 second holds. Consistency matters more than volume. As your endurance improves, you can gradually increase hold time or add resistance variations under professional guidance.
▸
Can chin tucks help with headaches or jaw pain?
Yes, for many people. Forward head posture increases tension in neck and jaw muscles, which can trigger tension headaches and TMJ discomfort. By restoring alignment, chin tucks reduce this strain. However, persistent headaches or jaw pain warrant evaluation by a healthcare provider to rule out other causes.
▸
Should I feel chin tucks in my throat or neck muscles?
You should feel gentle engagement at the base of your skull and deep front neck muscles, not strain in your throat or superficial neck muscles. If you feel discomfort in the front of your neck, reduce your range of motion and focus on slow, controlled movement. Proper form feels subtle, not intense.
Final Tips for Long-Term Posture Success
The chin tuck exercise is a powerful tool, but it is one piece of a larger posture puzzle. Be patient with your progress. Postural changes develop over weeks and months, not days.
Celebrate small wins: less end-of-day neck fatigue, easier deep breathing, or noticing slouching sooner. Pair chin tucks with mindful movement, ergonomic adjustments, and self-compassion.
Your head carries your entire world. Giving it the support of proper alignment is one of the simplest, most profound acts of self-care you can practice daily.
Sources:
● American Physical Therapy Association — Cervical Retraction Exercises for Neck Pain
● Journal of Orthopaedic and Sports Physical Therapy — Deep Cervical Flexor Training and Postural Endurance Research
● Occupational Safety and Health Administration — Ergonomic Guidelines for Computer Workstations
Sarah is a lifestyle and celebrity health writer who explores the intersection of fame, wellness, and personal stories. She researches trending topics and public figures to deliver engaging, well-sourced content that answers the questions readers are actually searching for — from celebrity health routines to lifestyle insights.