Ever stood in front of your mirror, brush in hand, watching the clock tick closer to your morning deadline? You want hair that looks put-together without requiring a degree in styling or an hour of your precious time.
That endless tug-of-war between wanting great hair and needing your life back is real. What if there was a cut that actually worked with your busy schedule instead of against it? Enter the low maintenance choppy shaggy shoulder length hair cut – a style that’s been quietly revolutionizing how busy people approach their daily hair routine.
This isn’t just another trend; it’s a practical solution that delivers effortless texture, built-in volume, and the kind of easy care that actually lives up to its promise.
What Exactly Is a Choppy Shaggy Shoulder-Length Cut?
The 3 Core Elements: Choppy Layers + Shaggy Texture + Shoulder Length
When we talk about choppy shaggy shoulder length hair, we’re really describing three distinct features working together. First, choppy layers create movement and break up the weight of your hair.
These aren’t your grandmother’s precise, uniform layers – they’re intentionally uneven, giving that cool, lived-in vibe. Second, shaggy texture adds softness and dimension throughout.
This texture comes from strategic cutting techniques that remove bulk while keeping length. Finally, shoulder length sits right at that sweet spot – long enough to pull back when you need to, short enough to dry quickly and stay manageable.
Think of it like the perfect casual outfit: it looks intentional but isn’t trying too hard. The shag haircut shoulder length variation has roots in the 1970s rock scene, but today’s version is softer, more adaptable, and way easier to live with.
How It Differs From a Classic Shag or Blunt Lob
You might be wondering how this compares to other popular cuts. A classic shag often features more dramatic layering and sometimes includes a mullet-like back.
The modern low maintenance shaggy hairstyle keeps things more balanced and wearable for everyday life. Meanwhile, a blunt lob (long bob) has clean, straight-across lines with minimal layering.
While a lob can look sleek and polished, it often requires more frequent trims to maintain that sharp edge and can fall flat without daily styling.
The choppy shaggy approach embraces imperfection. Where a blunt cut fights your hair’s natural movement, this style works with it. That’s the secret to why it’s genuinely low maintenance.
Why This Haircut Is Perfect for Low-Maintenance Lovers
Built-In Volume That Requires Zero Teasing

One of the biggest wins with choppy shaggy shoulder length hair is the instant volume. The layered structure naturally lifts hair away from your scalp, creating body without backcombing or product overload.
This is especially game-changing if you have fine or flat hair that typically needs serious intervention to look full. The choppy layers create visual interest and dimension, making hair appear thicker than it actually is.
Grows Out Gracefully (No Awkward Phases)
Here’s something that doesn’t get enough attention: this cut forgives you. Unlike precision cuts that start looking ragged three weeks after your appointment, the shag haircut shoulder length style actually improves as it grows.
The uneven layers blend naturally, and you won’t experience that frustrating in-between stage where nothing looks right. This means you can stretch appointments to 8-10 weeks if life gets crazy, and your hair still looks intentional.
Air-Dry Friendly: Style in Under 5 Minutes
On busy mornings, you might only have time to wash and go. That’s where this style truly shines. The textured layers enhance your hair’s natural pattern, whether that’s straight, wavy, or curly.
A quick scrunch with a little product while damp, and you’re done. No round brush acrobatics, no multiple hot tools, no complicated techniques. Just shake, maybe add a texturizing spray, and walk out the door looking like you tried (even when you didn’t).
Who Looks Best in This Style? (Face Shapes + Hair Types)
Face Shape Guide: Oval, Round, Square, Heart
One myth I need to bust: this isn’t a one-face-shape-fits-all situation. Here’s how to adapt it:
- Oval faces: You’re the lucky ones – almost any variation works. Try face-framing layers that hit at your cheekbones to highlight your balanced proportions.
- Round faces: Go for longer layers that start below the chin to create length. Add side-swept or curtain bangs to break up the roundness.
- Square faces: Soft, wispy layers around the jawline soften strong angles. Avoid blunt cuts that mirror your jaw’s sharpness.
- Heart faces: Balance a wider forehead with fuller layers around the chin area. Curtain bangs work beautifully here.
Hair Type Breakdown: Fine, Thick, Wavy, Curly, Straight
This is where most articles fall short, so let’s get specific:
Fine or thin hair: Yes, you can absolutely rock this! The key is asking for “razored layers” or “point cutting” rather than blunt scissor work.
These techniques create the illusion of thickness without removing too much weight. Avoid over-layering, which can make fine hair look sparse.
Thick or coarse hair: This cut is your best friend. The layers remove bulk and weight, making hair more manageable. Ask your stylist to “remove weight” while keeping length, and don’t skip the texturizing – it prevents the triangle effect.
Wavy hair: You’re in the sweet spot. The low maintenance shaggy hairstyle enhances your natural wave pattern. Just make sure layers are cut dry or while your hair is in its natural state so your stylist sees the real texture.
Curly hair: Curly shags are having a major moment. The key is cutting curly hair dry, curl by curl, to see how each section falls. This prevents the shock of hair springing up shorter than expected.
Straight hair: Add texture through cutting technique (not just products). Ask for “choppy ends” and “internal layers” to create movement that doesn’t rely on natural wave.
Age-Inclusive Styling: 20s to 60+ Adaptations
While many articles target this cut to middle-aged women (and yes, it’s fantastic for adding youthful volume), it’s truly ageless:
- 20s-30s: Go bolder with choppy texture, try curtain bangs or wispy fringe, experiment with face-framing pieces.
- 40s-50s: Soften the layers slightly, focus on face-framing to lift features, consider how it works with changing hair texture.
- 60+: Embrace the volume it creates for thinning hair, the cut works beautifully with gray or silver hair, shorter face-framing pieces brighten the face.
I’ve seen this cut on everyone from Gen Z college students to women in their seventies, and the common thread is confidence. It’s not about age – it’s about finding the right variation for your lifestyle.
Quick Reference: Best Variations by Feature
| Your Feature | Best Variation | Why It Works |
|---|---|---|
| Fine hair | Razored layers, minimal thinning | Creates volume without removing density |
| Thick hair | Heavy texturizing, internal layers | Removes bulk, prevents triangle shape |
| Round face | Long layers, side-swept bangs | Creates length, breaks up roundness |
| Gray/silver hair | Softer layers, face-framing | Adds movement, reflects light dimensionally |
| Busy lifestyle | Air-dry friendly texture | Minimal styling, looks good natural |
How to Ask Your Stylist for This Cut (Script Included)
Key Phrases to Use: “Choppy Layers,” “Face-Framing,” “Textured Ends”
Walking into a salon and hoping for the best is a recipe for disappointment. Instead, use these specific terms that stylists understand:
- “I want a low maintenance choppy shaggy shoulder length hair cut with face-framing layers”
- “Please use point cutting or razoring to create texture, not blunt scissor cuts”
- “Keep the length at shoulder level but add internal layers for movement”
- “I want it to air-dry well with minimal styling”
- “Please remove weight but keep enough density so it doesn’t look thin”
These phrases tell your stylist exactly what you need while showing you understand the cut. It establishes you as an informed client, which often results in better communication and outcomes.
What Photos to Bring (and What to Avoid)
Photos are essential, but choose wisely. Bring 3-5 images that show:
- The same hair texture as yours (don’t show curly photos if you have straight hair)
- Similar hair density (fine, medium, or thick)
- Different angles – front, side, and back
- Both styled and air-dried versions if possible
Avoid photos with heavy filters, professional lighting that hides texture, or celebrity photos with extensions. These create unrealistic expectations.
Instead, find real people with relatable hair on platforms like Instagram or Pinterest using hashtags like #shaghaircut or #shoulderlengthshag.
Budget-Savvy Tips: Prioritizing Layers Over Color
If you’re working with a limited budget, here’s my advice: invest in a skilled cut first, color second. A great shag haircut shoulder length looks amazing on natural hair.
The layers and texture create visual interest that doesn’t require expensive color corrections. If you do want dimension, ask for a simple gloss or toner rather than full highlights – it’s cheaper and adds just enough depth to make the layers pop.
Also, consider going to a stylist who specializes in textured cuts rather than the most expensive salon in town. Sometimes a mid-range stylist with shag expertise delivers better results than a high-end colorist who rarely does this cut.
5-Minute Styling Routines for Busy Days
The Air-Dry Method: Scrunch, Spray, Go
This is the ultimate low maintenance shaggy hairstyle routine. After washing:
- Gently squeeze out excess water with a microfiber towel or old t-shirt (regular towels cause frizz)
- Apply a quarter-sized amount of mousse or texturizing cream to damp hair, focusing on mid-lengths to ends
- Scrunch hair upward toward your scalp to encourage natural texture
- Flip your head upside down and let it air-dry about 70%
- Flip back, shake out roots, and let finish drying naturally
- Once dry, mist with sea salt spray or texturizing spray for extra piece-y definition
Total active time: about 3 minutes. The rest is just living your life while your hair does its thing.
Quick Blow-Dry Lift: Round Brush Technique for Crown Volume
On days when you need a bit more polish:
- Apply heat protectant and volumizing mousse to towel-dried hair
- Flip head upside down and rough dry roots until 50% dry
- Using a medium round brush, lift sections at the crown and dry while pulling upward
- For face-framing pieces, wrap around the brush and dry while pulling away from your face
- Finish with cool air to set the shape
- Shake out and add a light texturizing spray
This takes about 10-12 minutes but gives you salon-level volume that lasts all day.
Heat-Free Waves: Twist-and-Pin Overnight Hack
Wake up with texture without heat damage:
- Start with damp (not soaking) hair before bed
- Apply a light styling cream or mousse
- Take 2-inch sections and twist them loosely away from your face
- Pin each twist flat against your head with bobby pins
- Sleep on a silk or satin pillowcase to prevent frizz
- In the morning, unpin, shake out, and separate with fingers
You’ll have effortless waves that look like you spent an hour with a curling iron.
Product Cheat Sheet: What to Use (and Skip) by Hair Concern
For Fine/Flat Hair:
- Use: Volumizing mousse, root-lifting spray, lightweight texturizing spray
- Skip: Heavy oils, thick creams, silicone-heavy serums
- Try: Sea salt spray for grit and hold without weight
For Thick/Coarse Hair:
- Use: Smoothing cream, lightweight oil on ends, texturizing paste
- Skip: Heavy mousses, thick holding sprays that add bulk
- Try: Leave-in conditioner to manage frizz while maintaining texture
For Wavy/Curly Hair:
- Use: Curl cream, defining gel, leave-in conditioner
- Skip: Drying alcohols, heavy waxes that weigh down curls
- Try: Refresh spray for second-day curls
For Dry/Damaged Hair:
- Use: Hydrating leave-in, argan oil, heat protectant
- Skip: Alcohol-based texturizing sprays
- Try: Weekly deep conditioning to maintain softness
Maintenance Made Simple: Trims, Products & Care
Trim Timeline: Every 6-8 Weeks for Shape Retention
Here’s the truth about choppy shaggy shoulder length hair maintenance: while it grows out gracefully, you still need regular trims to keep it looking intentional. Aim for every 6-8 weeks if you want to maintain the exact shape.
However, if you’re okay with a slightly longer, more grown-out look, you can stretch to 10-12 weeks. The choppy layers mean split ends are less noticeable than with blunt cuts, giving you some flexibility.
Pro tip: Schedule your appointment before you leave the salon for your next visit. It’s easier to commit when you’re already there, and you’ll maintain consistency.
Wash Day Routine: Lightweight Shampoo + Conditioner Tips
How you wash matters as much as how you cut. For this style:
- Shampoo: Use a volumizing or clarifying shampoo at the roots only. Massage gently to avoid tangling the layers.
- Conditioner: Apply from mid-lengths to ends only. Never condition your roots – it weighs down the volume you’re trying to create.
- Frequency: Wash 2-3 times a week maximum. Over-washing strips natural oils that help texture hold.
- Water temperature: Rinse with cool water to seal the cuticle and add shine.
Seasonal adjustment: In humid summer months, use a clarifying shampoo once a week to remove buildup. In dry winter months, add a weekly deep conditioning treatment to prevent brittleness.
Refreshing Between Washes: Dry Shampoo & Texture Spray Hacks
The secret to extending your style between washes? Strategic product use:
- Dry shampoo: Apply to roots before bed, not just in the morning. This gives it time to absorb oil overnight. Focus on the crown and part line.
- Texture spray: Refresh second-day hair by misting mid-lengths and scrunching. This revives the choppy texture without washing.
- Root lifter: A quick spray at the crown, followed by flipping your head upside down and massaging, instantly adds volume.
For humid days: Keep a travel-size texturizing spray in your bag. A quick mist and scrunch can revive flat, humidity-weighed hair in seconds.
Common Mistakes to Avoid (And How to Fix Them)
Over-Brushing That Kills Texture
This is the number one mistake I see. That beautiful choppy texture you paid for? Over-brushing destroys it. Once your low maintenance shaggy hairstyle is dry, put down the brush.
Use your fingers to detangle or style. If you must brush, use a wide-tooth comb or a brush designed for textured hair, and only do it when hair is damp with conditioner in it.
The fix: Switch to finger-styling for daily maintenance. Your hair will look more natural and the layers will stay defined.
Using Heavy Products That Flatten Layers
It’s tempting to reach for that thick hair cream or heavy serum, but these products are the enemy of shaggy texture. They weigh down the layers, making your carefully cut style look flat and lifeless.
The fix: Choose products labeled “lightweight,” “volumizing,” or “texturizing.” Less is more – start with a small amount and add more only if needed. Remember, you can always add product, but you can’t take it out without washing.
Cutting Layers Too Short for Your Hair Density
This is a stylist mistake, but you can prevent it. If you have fine or thin hair and your stylist cuts the layers too short or removes too much weight, your hair can look sparse and stringy rather than textured and full.
The fix: Be clear about your hair density during consultation. Say: “I have fine hair, so please keep enough weight to maintain density.” Ask your stylist to show you the length before cutting too much. It’s easier to cut more later than to wait months for growth.
Troubleshooting: Is Your Shag Looking Flat?
Problem: Hair looks flat at the roots
Solution: Apply dry shampoo or root lifter to clean, dry hair. Flip head upside down and massage. Use a volumizing mousse on damp hair before drying.
Problem: Ends look stringy or sparse
Solution: You may have too many layers. Ask your stylist to blunt cut the very ends while keeping internal layers. Use a lightweight oil on ends to add cohesion.
Problem: Too much volume/poofy
Solution: Apply a small amount of smoothing cream or argan oil to tame frizz. Avoid mousses and switch to a lightweight texturizing spray instead.
Problem: Looks messy, not textured
Solution: You might be using too much product or not distributing it evenly. Start with less product and focus on mid-lengths to ends. Use fingers to separate and define pieces.
Real-Life Inspiration: 10 Choppy Shag Variations to Try
With Curtain Bangs for Soft Framing
Curtain bangs are having a major moment, and for good reason. These face-framing pieces part in the middle and blend seamlessly into your layers.
They’re perfect if you want the bangs look without the high maintenance of straight-across fringe. Curtain bangs work with almost every face shape and can be styled multiple ways – swept to the side, pinned back, or left to frame naturally.
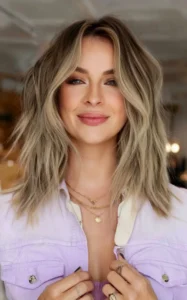
For Fine Hair: Razored Layers for Illusion of Volume
If you have fine hair, ask your stylist to use a razor instead of scissors for your layers. Razor cutting creates feathered, wispy ends that make hair appear fuller.
The key is keeping the layers longer – starting at chin length or below – so you don’t lose density. Add subtle highlights around the face to create dimension that makes layers more visible.
For Curly Hair: Defined Shag with Curl Cream
Curly shag haircut shoulder length styles are absolutely stunning. The secret is cutting curls dry, one by one, so your stylist sees exactly how each curl falls.
This prevents the shock of curls springing up shorter than expected. Use a curl-defining cream and scrunch while damp. The layers will enhance your natural curl pattern rather than fighting it.
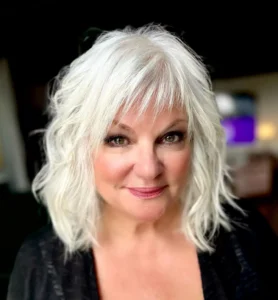
Gray Hair Friendly: Dimensional Layers That Enhance Silver
Gray and silver hair can sometimes look flat or dull, but a choppy shag changes everything. The multiple layers catch light from different angles, creating natural dimension.
Ask for softer, blended layers rather than super choppy ones, and consider a violet or silver toner to keep brassiness at bay. The texture makes gray hair look intentional and modern, not aged.
Bonus Variations Worth Considering:
- With wispy fringe: Light, piece-y bangs that blend into face-framing layers
- Blunt-ended shag: Keeps ends thicker for fine hair while maintaining internal texture
- Asymmetrical shag: Slightly longer on one side for an edgy, modern look
- Beachy wave shag: Extra texturizing for that just-came-from-the-ocean vibe
- Professional polish: Softer layers that can be smoothed for office settings